
Introduction,
Any kind of smart home assistants lets say like are cool gadgets to have. You can easily buy them online but for a guy like me who likes to tinker around and prefers to make my own stuff its much more appealing to make my own. and we can make Alexa with Raspberry Pi. So in this article I’ll show you how you can setup Amazon Alexa on your Raspberry pi!
Prerequisite
- Install Raspberry Pi OS (previously called Raspbian)
- Assign Static IP address to Raspberry Pi
Hardware required
Step 1: Creating Amazon Developer Account
Go to https://developer.amazon.com and click on sign in. Then create your account. Your developer Amazon account is different from your Amazon’s shopping account so you need to create one.
Now that you’ve signed up, it’s time to setup the Alexa service. So that you can use Alexa on the Raspberry Pi.
Step 2: Setting up product information
[smartslider3 slider=”4″]
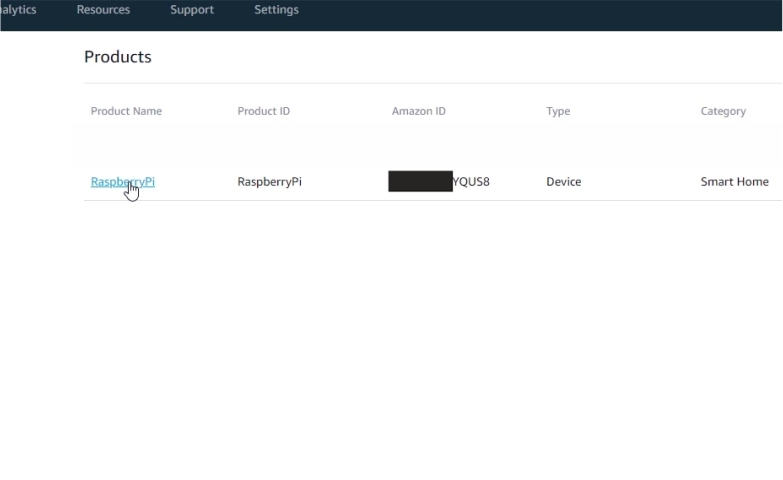
After login you will need to click on developer Console. From here select Alexa -> Alexa Voice service. This will take you to new page over there select Products. After which click on Create Product
On this screen, Enter a Product name and Product ID. I entered RaspberryPi, in both but you can choose your own name.
Select Device with Alexa built-in as the product type, Select No under Will you use a companion app and select Smart Home as the product category, enter RaspberryPi into the category and description text boxes.
Select Hands-free & Far Field for How will users interact with your product?
and then for the remaining buttons, select NO for all of them.
After all of that is done Click “Next”.
Step 3: Creating Security Profile
[smartslider3 slider=”5″]
Now we need to create a Security Profile. So click on Create New Profile and give it a name and description I again used RaspberryPi in both. and then, click Next.
Now we need need to add some URLs to the Allowed Origins and Allowed Return URLs
For this section, you’ll also need the IP address of your Raspberry Pi. That is why I told you to Assign Static IP address to your Raspberry Pi in Prerequisite.
To get IP address of your Pi you can type ifconfig in Terminal of your Raspberry Pi.
Under “Allowed Origins” add
http://localhost:5050
https://localhost:5050
http://YourPiIPAddress:5050
https://YourPiIPAddress:5050
Then fill in the allowed return URLs with
http://localhost:5050/code,
https://localhost:5050/code,
http://YourPiIPAddress:5050/code
https://YourPiIPAddress:5050/code
Replace YourPiIPAddress with the IP address of your Raspberry Pi.
In my case, my IP address was 192.168.0.100
Once that is done, check to the T&C and click Finish.
After that it will pop and will say you have Created a product.
Step 4: Getting Client ID and Client Secret


After creating the product go inside your product. In my case RaspberryPi and you will see on Top your Client ID and Client Secret. So copy them and store it we will use them later.
Along with that go into Capabilities and check
- Named Timers & Reminders
- Display cards with Text
Step 5: Installing AlexaPi on Raspberry Pi

For installing AlexaPi just Copy paste all the command line mentioned below one by one in Terminla and press Enter after copy pasting each line,
cd /optsudo apt-get install gitsudo git clone https://github.com/alexa-pi/AlexaPi.gitsudo ./AlexaPi/src/scripts/setup.shAfter entering last line, it will ask you for your preference along with recommended option in bracket. So just copy paste the recommended options. After that Pi will take some time (5-10 Mins).
Step 6: Entering Product ID, Security Profile Description, Client ID…
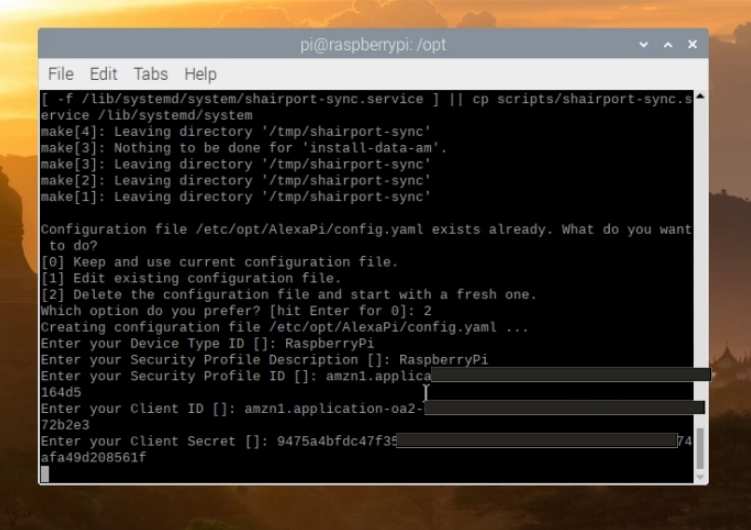
When it asks you for your Product ID, Security Profile Description, Client ID etc. enter them which we copied in Step 4.
Remember, everything is case sensitive so add exactly same
Device Type ID means Product ID which we set as RaspberryPi,
Security Profile Description is under Security Profile tab once again its RaspberryPi for me.
Security Profile ID is Exactly under Security Profile Description
After that just enter your Client ID and Client Secret and hit Enter.
Step 7: Authentication


After following Step 6. If everything was right Raspbery Pi will show you an URL so click on it or Copy paste it in your browser and wait for browser to load. Then it will show you and Pop up. Asking for permissions so click on Allow and you are ready to go! It will show you Success!
Step 8: Reboot
After successful Authentication connect USB microphone and a Speaker. Then all you have to do is reboot your Raspberry Pi. After rebooting you will hear Alexa saying Hello!
to reboot you can type following command
Sudo rebootTroubleshooting,
For some reason if your AlexaPi is not working try these lines of code
sudo nano ./AlexaPi/src/scripts/inc/os/debian.shthe above command will allow you to change few lines of code so on this page go forward and change,
vlc-nox to vlc-bin
After doing so press CRTL+X then Y and press Enter
We have another article showing how to Enable VNC service on Raspberry pi you might like it!


At the time of authorisation it is showing an error
What error you are getting?
Can you connect speaker with bluetooth and mic with 3.5mm jack
Nope
Hi I tried rebooting and did not hear alexa saying hello ?
alexa audio output is getting only in hdmi even after output audio device changed to audio jak
This site can’t be reached @ Step 7: Authentication
so tell me …
Hi,
thanks for the tutorial. it was pretty straight forward aside from one error that caused issues when i tried to bring up the pi web authenticator. the issue that i’m have is getting the following message after entering my amazon credentials.
We’re sorry!
An error occurred when we tried to process your request. Rest assured, we’re already working on the problem and expect to resolve it shortly.
I’m not sure where to go to try to debug this issue. if you happen to know i would really appreciate it.
Wait some time and try again Servers are down of Amazon
@NematicsLab – thanks for the response… By any chance is there a notification when the servers will be back online? I’m really eager to get it working. 🙂